
Teaching Kids in Zimbabwe to Design Away Their Problems

Not having money forced us to think creatively at Zimbowties
When you grow up in a country where the mantra for survival is “make a plan” you quickly learn how important it is to be flexible and adaptable when faced with problems. In addition to this, I’ve been extra lucky to have ended up in a career of Product Design which has given me a skill set that allows me to apply creativity to those plans that I’ve inevitably had to make! It’s funny how adding a grain of creativity has often turned my problems into opportunities!
For example, when we started up Zimbowties we didn’t have a lot of spare cash to buy the colourful African fabric that we wanted to make our bow ties out of. We didn’t let this stop us as we started to think of other ways to get our hands on fabric. It turned out that a lot of tailors in town weren’t using their fabric off-cuts for anything and so suddenly we had an opportunity to reduce waste, and make bow ties that were all unique as nearly each one is now made out of a different kind of fabric.
For many other people though, I feel that when they have to “adapt” to problems it more than often leads to them settling for something that is worse than what they might have ideally wanted. This is unfortunate because I think that the creative skills that I’ve been lucky enough to have learnt don’t actually require you going to university to figure out! They just have to be taught to you, but a lot of schools in Zimbabwe just don’t have this in their curriculum.
So what chance do kids, especially those in less wealthy schools, ever have of getting shown these things? Well, currently not a lot. But as part of our mission at Zimbowties to find creative kids to give scholarships to, I decided that I wanted to change this. So at the start of May, I ran my first Design Thinking workshop for the kids at the Amatelaz Homework Centre, that falls under the wing of Operation Orphan, in my hometown, Mutare.
I ran the workshop over 3 afternoons to teach the kids what I thought would be the most important parts of Design Thinking for them to learn about:
Identifying Problems
Finding Solutions
Testing Your Solutions
Identifying Problems
On the first afternoon, I introduced the kids to the idea of Design Thinking. I told them that we were going to try helping a group of people in our own community by identifying problems that they might have, trying to come up with solutions for them, and testing out the best ones.
I got the children in the workshop to pick a group of people in our local community that they’d most like to help out. Interestingly, the kids selected blind people as those that they’d most like to assist and none of them chose to help themselves, school kids.

The three basic parts to Design Thinking that I taught the kids
The first task I got the kids to do was to Map the Journey of a blind person through their day. The kids decided that their hypothetical blind person would be a man called Paul who was 40 years old and unemployed. They drew all the different activities that Paul did throughout his typical day. Then they had to critically look at each of these activities and identify how Paul might struggle with them and the problems that he might face.
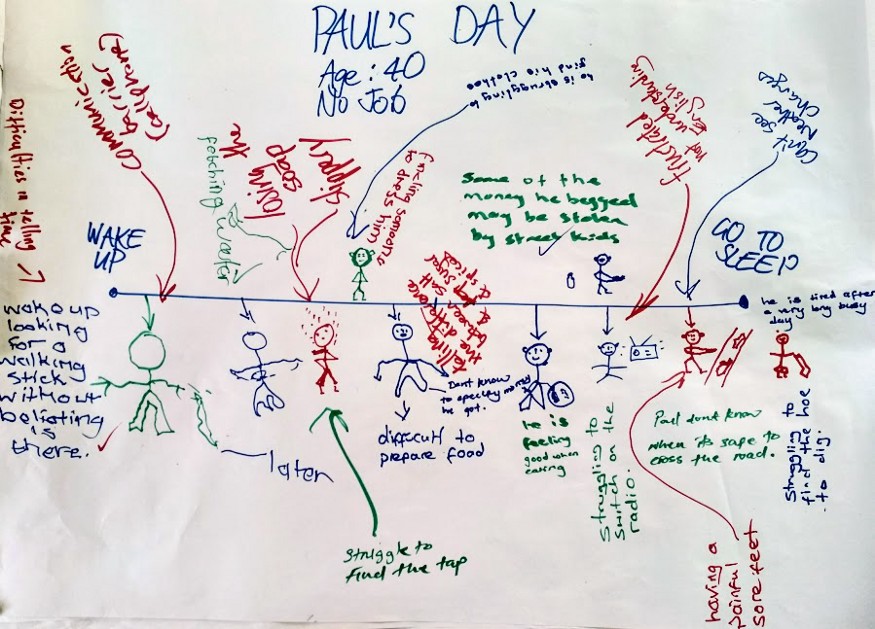
How the kids mapped the day of a hypothetical blind person in our community
I was really intrigued by the things that the kids identified as potential problems for a blind man in our community. Some that stuck out to me were:
How does Paul know when the weather is changing? He might get soaked in a sudden downpour of rain
The water supply is often turned off at Paul’s house so he might have to collect water, how does he find this water and when he gets the water how can he tell if it is safe to drink?
Paul has to beg for money and there are some people who pick on blind people by trying to scare them with loud noises or by stealing their money
Paul might struggle to use a cellphone and so could be isolated when he can’t contact people
Mapping the Journey was a really useful tool to teach the kids to use as it allowed them to try put themselves in the shoes of Paul. I then had the kids vote for the problems that they most wanted to find solutions for.
They voted for the challenge of crossing the roads as most important. There are no road crossing points in our town with assistive technology such as traffic lights with beepers, contoured paving or pedestrian bridges. The next task was for us to find ways to solve this problem.
Finding Solutions
On the second afternoon of the workshop, we set about answering the question: How might we help blind people cross the road in Mutare?
To come up with solutions I taught the kids how they can use brainstorming to come up with lots of ideas for solving a problem. Before we started the brainstorm I shared with them the 7 rules of brainstorming outlined by IDEO.org
1. Defer judgement. You never know where a good idea is going to come from. The key is make everyone feel like they can say the idea on their mind and allow others to build on it.
2. Encourage wild ideas. Wild ideas can often give rise to creative leaps. In thinking about ideas that are wacky or out there we tend to think about what we really want without the constraints of technology or materials.
3. Build on the ideas of others. Being positive and building on the ideas of others take some skill. In conversation, we try to use “and” instead of “but.”
4. Stay focused on the topic. Try to keep the discussion on target, otherwise you can diverge beyond the scope of what you’re trying to design for.
5. One conversation at a time. Your team is far more likely to build on an idea and make a creative leap if everyone is paying full attention to whoever is sharing a new idea.
6. Be visual. In live brainstorms we write down on Post-its and then put them on a wall. Nothing gets an idea across faster than drawing it. Doesn’t matter if you’re not Rembrandt!
7. Go for quantity. Aim for as many new ideas as possible. In a good session, up to 100 ideas are generated in 60 minutes. Crank the ideas out quickly and build on the best ones.
The kids then set about sharing some of the ideas that they had already come up with and inventing new ones as they went along, inspired by the ideas of their peers.

Brainstorming ideas to help blind people cross the road in our town
Ideas that stood out for me were:
Having specified crossing points where people were paid to help the blind cross the road
The kids at the Centre could go out on the weekends and help blind people in the community
Having a handheld device that communicated with traffic lights so that the lights could change when the person was approaching and to help direct the blind person to the crossing point
Having “super-cool” glasses for blind people that had sensors in to assist them
Having our own Superman who could fly around helping the blind!
Teaching the kids how to Brainstorm is such a simple but powerful tool that I hope they will not forget. Brainstorming allows you to tackle a problem from multiple viewpoints, it forces you to not get stuck on the first solution that pops into your head (because often this solution is not necessarily the best one and you don’t want to waste time developing a dud), it allows a group to all get a chance to share their ideas without fear of judgement (especially those that are more introverted), and finally, everyone has some ownership of the project as they were all included in getting to the best idea.
At the end of the session, the kids had to vote again, this time for the ideas they thought were the best. They selected the handheld device and the super-cool glasses as the top ideas to take forward to the final testing stage of the design process.
Testing Solutions
On the last day of the workshop, I split the kids into two groups to build quick models or “prototypes” of the handheld device and the super-cool glasses ideas. They also had to put together a short skit (or role-play) to demonstrate the use of the model they made to the other group, the supervisors and myself.
The first group built a model of the hand-held device which to my surprise had become very techie. They included a speaker that could read out instructions to the user, sensors that helped calculate the distance to the nearest traffic lights, a smell emitter that produced different smells depending on where you were in town and finally there was a radio in case you wanted some music to listen to while you walked!

The hand-held device that helps guide blind people to traffic lights
In their short skit the first group showed a blind man holding the device as he approached some “talking” traffic lights that guided him to the crossing point, told him when it was safe to cross, and told him when he was safe across the road.
After the first group demonstrated their system to everyone the floor was opened up for feedback which is the most important part of building a prototype and simulating its use. One observer pointed out that it might be a problem for a blind person to tell the difference between the red and the green buttons on the device. The group had to then consider that if the controller was ever developed it might be important for them to have buttons that felt different when touched to tell their different functions apart.
The second group then showed the system that they had devised where the super-cool glasses were linked up to a central computer which monitored the location of the blind person in town.
In the second group’s role-play a controller sat at the computer to assist a “blind” student travelling through town by switching the traffic lights to red for the traffic whenever the student needed to cross the road.

The central controller’s computer with which they can assist blind people around town
Feedback from the skit? A big concern with the system was what would happen if the controller fell asleep?!
Building prototypes and role-play are two useful design methods for testing out ideas. Building prototypes allowed the kids to quickly realise some of the challenges that a blind person might face in using their solution and role playing the actual use of the prototypes allows the kids to demonstrate their prototypes, put themselves in the shoes of blind people and get feedback on their solution.
If we had more time I would have loved to have got the kids to actually interview people with visual impairments in our community to get a real understanding of their problems and to run some of their ideas by them.
Design Away!
At the start of the workshop I was slightly worried that I might not be able to get the kids on board and keep them engaged. However by the second day when I asked the kids to reflect on Day 1, one of boys stood up and very easily explained the three steps of Design Thinking to the rest of the group. He even went on to explain that at the end of Step 3 (Testing Your Solutions) you might need to go back to Step 1 (Problem Finding) and Step 2 (Finding New Solutions) to develop a final product! I was seriously impressed by this and it affirmed by belief that design thinking is really accessible to anyone and it can give them a framework to structure their thinking, share ideas and find creative ways to improve their lives and the lives of people around them.
…
Thanks for reading this. If you’d like to run your own Design Thinking Workshop you can download my rough lesson plan from this link or head over to http://www.designkit.org/methods to find your own methods to teach kids.